MAINTENANCE
RECOMMENDATION FOR LAYING CERAMIC TILES
Laying Techniques
Adhesion, understood as the strength of the bond between the ceramic piece and the base, plays a vital role in the quality of the tiled surface. Good adhesion should guarantee that the tile is firmly fixed to the base. The develop- ment of new low porosity ceramic ma- terials that are resistant to abrasion and sub-zero temperatures, large formats, and their installation in industrial or large commercial areas, facades, etc., has led to a corresponding development in adhesive products.
Increased knowledge about the use of special adhesives means that thick layer installation (mechanical adhesion) is being replaced by thin layer installation (chemical adhesion); the latter offers clear advantages, particularly in relation to quality of both adhesion and durability. The appropriate adhesive must be chosen, taking into account the surface to be tiled and the type of ceramic tile.
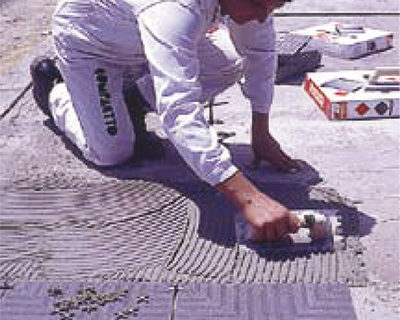
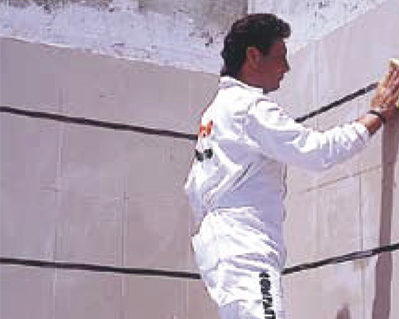
It is very important to use the right tools when laying the tiles (notched trowel, white rubber mallet, spirit level and suction cup). The substrate on which the tiles are to be laid must also be free of any plaster, paint residues etc., thus enabling the adhesive to be effective over time.
The adhesive manufacturer’s instructions must be followed at all times.
Laying techniques | Movement joints
Movement joints, whether structural, perimeter, dilation or laying joints, must always be respected for a perfect installation.
Structural joints:
These must always follow the instructions given in the project by a specialised engineer or architect.
Perimeter joints:
These must be continuous and no less than 8 mm wide. Their purpose is to insulate the ceramic floor tiles from other tiled surfaces such as walls (hidden by the skirting), columns or doors.
The omission of perimeter joints is one of the most frequent causes of ceramic tile lifting.
Partition joints:
Partition or expansion joints are used
to allow for deformations caused by the temperature variations between the tile, the adhesive and the substrate. Large tiled surface areas must be subdivided into smaller sections, delimited by partition joints, in order to avoid stress caused by expansion and contraction. Where floors are subject to high pedestrian traffic, hard wheels or the dragging of heavy loads, specially designed partition joints suitable for heavy loads must be used.
Installation joints:
To protect against any structural (expansion-contraction) movements, a separation joint must be fitted between all con- tiguous tiles. These should be laid with a separation of no less than 2-3 mm.
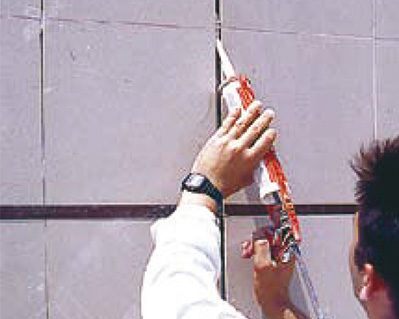
Installation joints offer several advantages: they help to absorb deformations caused by the substrate and ameliorate the stress generated on the bottom of the tile when the floor is subject to loads. Accumulated stress may eventually cause tiles to lift. They also have an important aesthetic function and highlight the beauty of the tile. The joints can have a smooth finish, level with the tiles, or a sunken concave finish. They are generally applied to interior and exterior tiled walls. Low porosity, deformable and water-resistant grouts are also available.
Suitable for facades, floors subject to heavy and local traffic with persistent presence of water. For surfaces where the presence of acids and alkalis is commonplace, such as food or health related premises, two-component reactive resins such as epoxy grouts should be used. This type of grouting material is composed of synthetic resins (usually epoxy resin). Their main properties are: resistance to chemicals, bacterial resistance, very good resistance to damp and excellent resistance to abra- sion.
The adhesive manufacturer’s instructions must be followed at all times.
The minimum separation between tiles should be no less than 2-3 mm for interiors and 3-5 mm for outside areas.
Classification of grouts according to the EN 13888 standard
MODIFIED CEMENT-BASED GROUTS CG2
Optional ArW (high abrasion resistance and low water absorption)
REACTIVE RESIN-BASED GROUTS RG
Generally two-component grouts, epoxy based, resistant to chemicals, completely impermeable and highly resistant to compression.
The use of grouts containing micronised carbon (carbon black) should always be avoided.

Técnica de colocación | Material de agarre
Two techniques are used for laying ceramic tiles: the thick layer and the thin layer methods.
It is very important to remember that the installation of porcelain stoneware requires the substrate to be completely level and free of any substances that may interfere with efficient adhesion. The thin layer technique must always be employed, using a notched trowel, a white rubber mallet, a spirit level and a suction cup. For outside applications and formats larger than 900 cm2, the double bonding technique should be used, i.e., the adhesive is applied to both the substrate and the back of the tile.
The adhesive manufacturer’s instructions must be followed at all times.
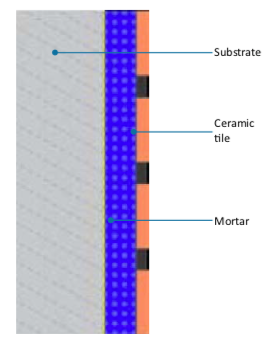
The thick layer method.
This is the traditional technique for laying tiles, whereby the tile is laid directly onto the substrate (partition wall, brick, reinforced concrete).
This is a cheaper me thod and also enables defects in levels to be corrected. The adhesive material used with this method is traditional mortar.
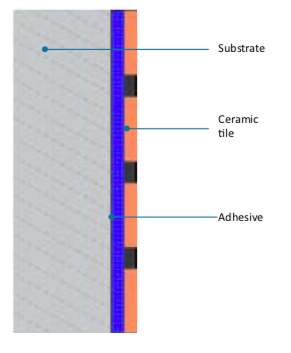
The thin layer method, (with adhesives).
This is a more recent technique, adapted for use with modern ceramic materials and a wide range of substrates.
The tiles are usually laid on a previously prepared base, whether plastered walls or a cement floor base. This technique has clear advantages: it is suitable for any type of ceramic tile and is compatible with all substrates.
Appropriate adhesives are available for all types of base and ceramic tiles and they offer ample rectification time. They absorb any deformation in the substrate and their adhesive performance is higher. The adhesive materials used with this method are cement-based adhesives, adhesive pastes and reaction resin adhesives. The following types of cement glues may be considered, depending on the properties of the ceramic tile to be laid.
Adhesives are classified according to the EN 12004 and 12002 standards for ceramic tile adhesive and deformability.
Cement-based adhesives C2
Modified cement-based adhesives
Dispersion adhesives D2
Modified dispersion adhesives
Reaction resin adhesives R2
Reaction resin-based adhesives
Thick layer
Thin layer
Use and care of porcelain stoneware tiles
The low porosity of porcelain stoneware tiles makes them highly resistant to staining.
However, if certain strong dyes are spilled or accidentally come into con- tact with the surface of the polished or semi-polished porcelain stoneware tile, staining may occur if it is not cleaned immediately. It is therefore advisable to clean up any spills as quickly as possible.
Once the tiles have been laid and grouted, a cement film or residue can usually be seen on the surface of the tiles. These residues can normally be removed with a diluted acid solution.
As a general rule, the following precautions should be borne in mind:
*Acid-based products should never be used to clean recently laid ceramic tiles; the acid reacts with the unset cement, which may damage the joints or deposit insoluble compounds on the surface.
*Surfaces should be soaked in clean water before carrying out any treatment using chemicals (installation joints).
*Routine maintenance consists of regular cleaning with water and a diluted ammonia-based detergent.
* When more thorough cleaning is required to eliminate stains or scaling that have penetrated the surface and cannot be removed by regular procedures, any aggressive stain removal product should first be tested on a spare tile. Chemical degradations that could worsen the condition of the tile should be avoided.
The manufacturer’s instructions should always be followed.
*Metal spatulas or abrasive scourers should not be used.
*After installation, floor tiles should be covered with cardboard, sawdust or similar to protect them from damage during any subsequent work.
The right tools should be used to cut and perforate porcelain stoneware tiles in order to avoid breakages or any other damage.
To make straight tile cuts, use a hand tile cutter with a Widia scoring wheel, wet cut diamond blade tile cutter and/or a low-power radial-arm tile saw with a continuous rim diamond blade.
To perforate or make holes in a porcelain stoneware tile, use a diamond-cutter drill bit. In this case electric drills should not be used in the hammer mode; the area being perforated should be cooled with water regularly to prevent the temperature rising and the drill bit melting.
Recommendations for laying rectangular pieces
Floor tile patterns with a broken joint overlap of more than 14 cms are not recommended.
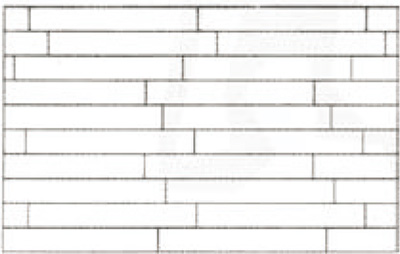
Broken joint pattern (from 2 to 20cm)

Standard straight pattern
(NOT RECOMMENDED)
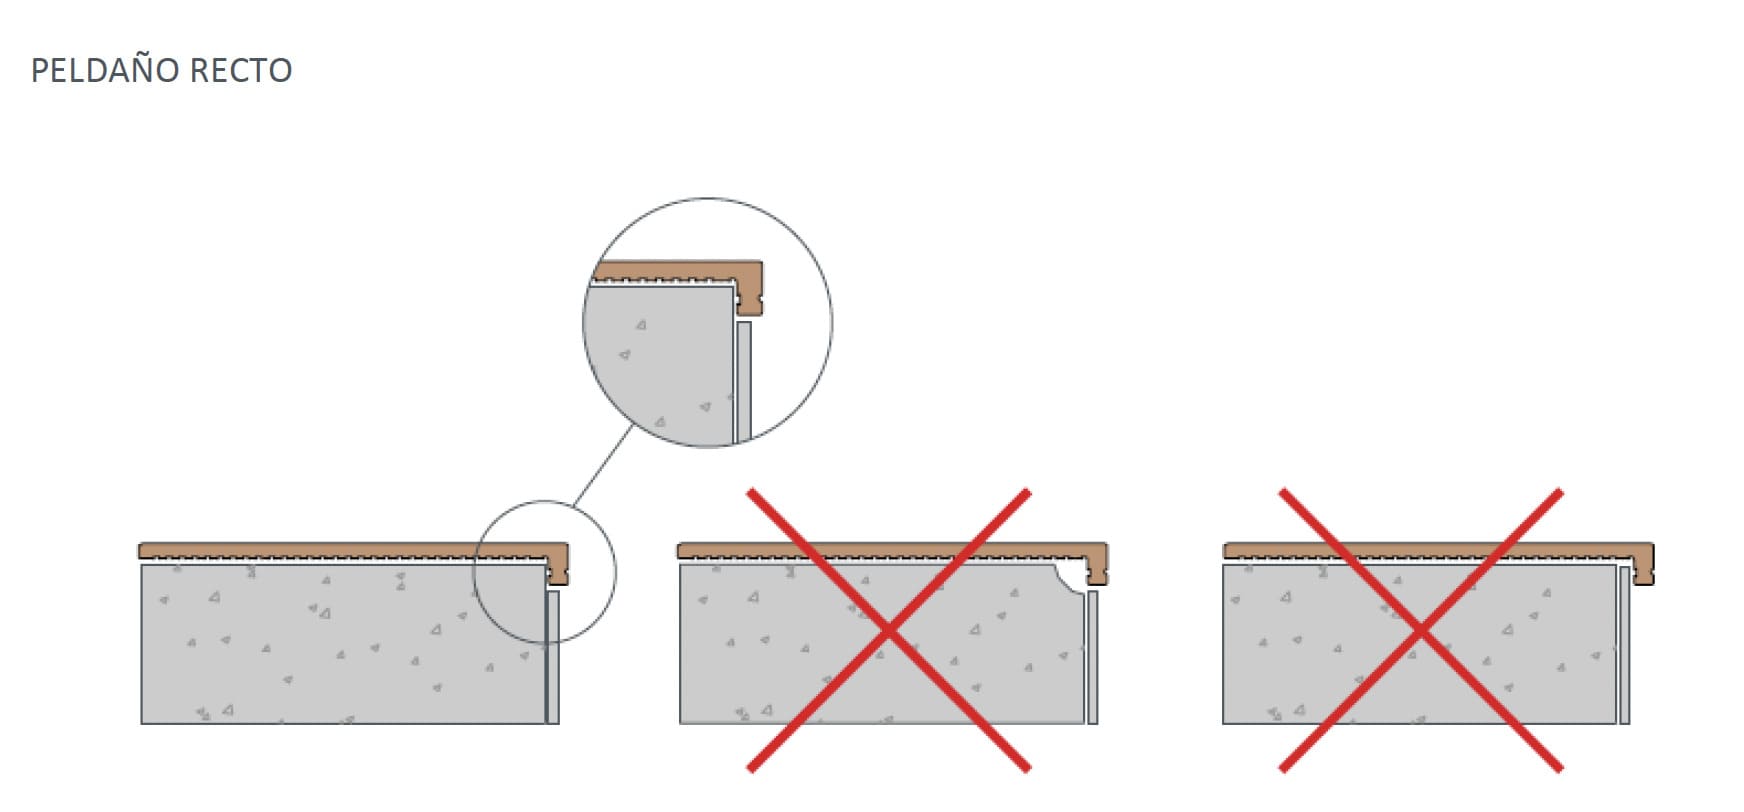
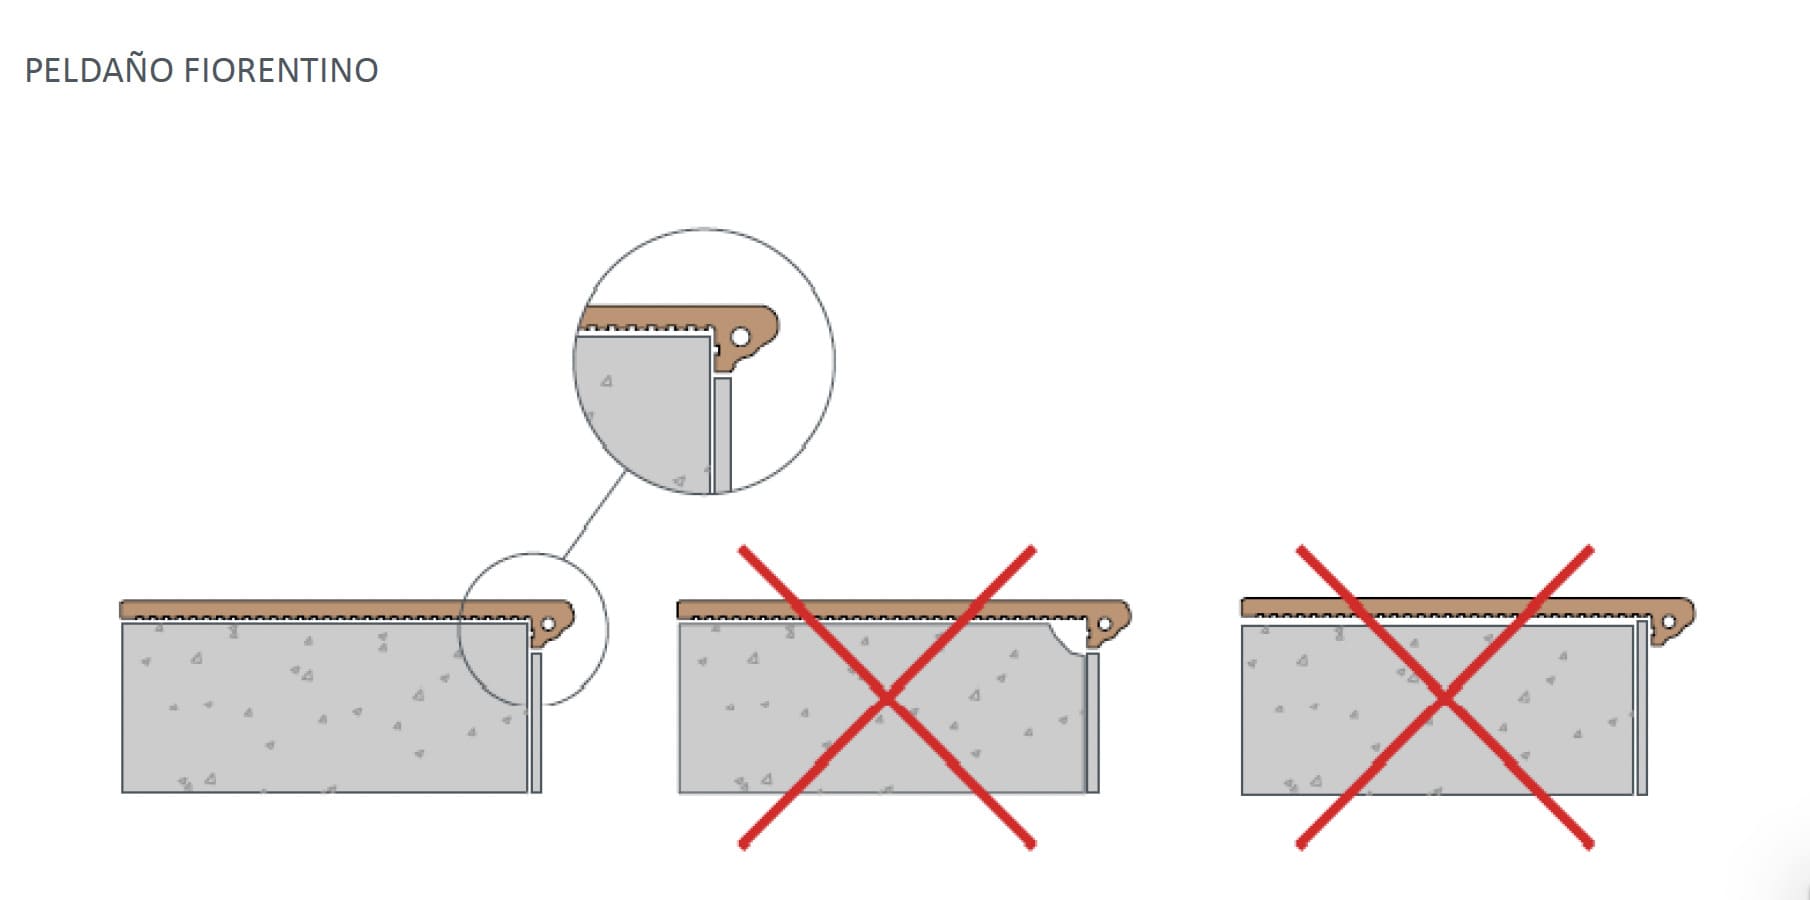
Installation of steps
INSTALLATION SUGGESTIONS
Pamesa Grupo Empresarial Series are a glazed and very low water absorption extruded ceramic, product norm EN ISO 14411 A1 Group. Although the back tiles profiled in dove tail to increase the adherence to the setting mortar, se recommend, without excluding any other possible systems, installing the tiles and special pieces with a thin set mortar method. In outdoor places with a hard cold weather, risk of freeze or when placing in exterior wall, the use of “flexible thin set mortar” is recommended, “special porcelanic tile” or “high strength mortar” from a known manufacturer of ceramic tile installation materials, available in any building materials warehouse or tiles dealer.
INSTALLATION SLAB
Must be clean, dry, structurally sound and ensure the rough surface. A cleavage membrane is necessary in concrete slabs with a deflection and building structures with a movement. Small sizes tiles, wide joints between tiles and movement joints are recommended.
THICK BED METHOD
In that case, use cement mortars with latex admix, for improved bond to the very low absorption tiles. You can use medium thickness bed mortars for leveling and installing.
THIN BED METHOD
The installation system, over clean, dry structurally sound and free from any bond breaking surface, consist in placing a thin bond coat (C2 Type EN 12004:01 norm), extended continuously with notched trowel. In exteriors the water draining slopes will be carefully resolved, as well the waterproofing slab and the placing perimeter joints and expansion joints every 5×5 m. The joint between pieces will be 5 mm. to respect modularity and the correspondence of joints between different sizes and/or specials pieces.
VERY IMPORTANT: we recommend setting the pieces with the back grooved in the same direction.
GROUTING
The grouting will be done by a grout that adequate its characteristics to the coating and the use of installation, choosing any grout from any known manufacturer, whose range of colours and materials are usually wider. Grout must be CG2 Type (EN 13888 norm) using grout RG Type (epoxy grout) for best chemical and stain resistance.
TECHNICAL SUPPORT
It is recommended to be advice by the chosen manufacturer in order to be technical supported about characteristics, instructions of use, open time, etc. as well as cleaning tips after installing tiles.
PREVIOUS TASKS BEFORE INSTALLATION
Before laying the tiles, mix them from several boxes and pallets, in order to ensure a uniform look and the best result.
CLEANING AND MAINTENANCE
After the installation and the first cleaning, remove the cured grout with AGC-Cement or a similar product. Follow the instructions of use from manufacturer. Use specific ceramic cleaners in the maintenance tasks.
EXTERIORS FLOORS
Exterior floors are submitted to several requirements and weather conditions, frost, thermal shocks, etc. which are able to cause damages. It is essential to check the masonry works, installation method and quality of tiling materials. Appropriate slopes, waterproofing, expansion and perimeter joints, grouting and sealing the joints, are fundamental.